Thursday, March 31, 2011

Hungry Girl Trios...


Ranch-O Bacon Chicken PER SERVING (entire recipe): 186 calories, 3g fat, 429mg sodium, 1g carbs, 0g fiber, 0.5g sugars, 35g protein -- PointsPlus™ value 4*

So much flavor... so few ingredients. Rock on, chicken cutlet!


Ingredients:
One 5-oz. raw boneless skinless lean chicken breast cutlet
1/2 tsp. dry ranch dressing/dip mix
1 tbsp. precooked real crumbled bacon (like the kind by Oscar Mayer)
Spices: black pepper

Directions:
Preheat oven to 375 degrees.

Spray a baking pan with nonstick spray. Season each side of the chicken with a dash of black pepper, and then place the chicken in the pan. Season the top of the chicken with ranch dressing/dip mix.

Evenly place bacon over the top of the chicken. Use a spatula or the back of a spoon to gently press down and help the bacon adhere.

Bake in the oven until chicken is fully cooked, 20 - 25 minutes.

Eat up!

MAKES 1 SERVING


Tuna Melt Bites

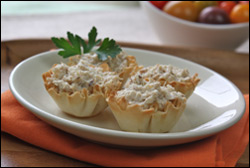
PER SERVING (1/3rd of recipe, 5 pieces): 143 calories, 5g fat, 452mg sodium, 11g carbs, 0g fiber, 1g sugars, 14g protein -- PointsPlus™ value 4*

We could eat an entire batch of these by ourselves in one sitting -- good thing they're so low in calories!

Ingredients:
One 15-piece box frozen Athens Mini Fillo Shells
3 wedges The Laughing Cow Light Creamy Swiss cheese
One 5-oz. can albacore tuna in water, drained and flaked
Spices: salt, black pepper

Directions:
Preheat oven to 350 degrees.

Place shells on a baking sheet sprayed lightly with nonstick spray. Bake in the oven until shells are golden brown, about 5 minutes. Set aside to cool.

Place cheese wedges in a microwave-safe bowl and microwave for 30 seconds, or until softened. Stir until smooth. Add tuna and a dash each salt and pepper. Mix well.

Evenly distribute the cheesy-tuna mixture among the baked shells, about half a tablespoon per shell.

Now eat!

MAKES 3 SERVINGS


Go to Hungry Girl also check out her new book 300 under 300

Wednesday, March 23, 2011

going...going...GONE...

Since Kenneth and I are both trying to eat healthier and use less of the WHITE products; sugar and flour, and I just used the last of the white sugar last night, I was checking into alternative sweeteners...
Honey, Molasses, Stevia, Agave... to name a few.

Here is a little of what I found:

Found this online: Here is a Stevia conversion chart: 1 Tsp Stevia (powered)=1 Cup Sugar 1 Tsp Stevia (liquid)=1 Cup Sugar 1/2 Tsp Stevia=1 Tbsp Sugar 6 Drops liquid Stevia=1 Tbsp Sugar A pinch of Stevia=1 Tsp sugar 2 drops liquid stevia=1 Tsp sugar The bulk or consistency that sugar normally would add can be replaced with applesauce, fruit puree, canned pumpkin, fruit juice, yogurt, or any ingredient that will taste right with your recipe and add moisture. For everyone cup of sugar that is replaced by stevia 1/4 to 1/2 a cup of the bulk should be added.

http://articles.mercola.com/sites/articles/archive/2009/07/02/Agave-A-Triumph-of-Marketing-over-Truth.aspx

http://articles.mercola.com/sites/articles/archive/2010/07/03/can-this-popular-alternative-sweetener-spike-uric-acid-into-the-danger-zone.aspx

http://care.diabetesjournals.org/content/29/9/2140.full

http://lowcarbdiets.about.com/od/nutrition/a/fructosedangers.htm

If you find any more helpful information please leave a comment.

Tuesday, March 22, 2011

Whats for supper?

Sweet Potato Casserole With Sausage

(found on page 198 of The Garden-Fresh Cookbook)

  • 6 large sweet potatoes, peeled and quartered
  • butter, to taste
  • salt and pepper, to taste
  • 1 pound Italian sweet sausage, casings removed
  • 2 cups fresh mushrooms, diced
  • 1 large onion, diced
  • 4 medium red apples, peeled, cored, and thinly sliced
  • 1 cup shredded cheddar cheese

Preheat the over to 350°F. Grease a 13x9-inch baking dish. Put the sweet potatoes into a saucepan, cover them with water, and bring them to a boil. Reduce the heat and simmer until the potatoes are fork-tender. Drain, then add the butter and salt and pepper. Mash the potatoes and set aside.

Crumble the sausage into a skillet over medium heat and sauté until done. Drain the fat, reserving 2 tablespoons. Transfer the sausage to a bowl. Return the skillet to the heat, add the reserved fat, mushrooms, and onion, and cook until the onion is soft.

In the prepared baking dish, layer half of the mixture, half of the sausage, and all of the apple slices. Repeat (ending with the sausage). Bake uncovered for 35 minutes. Sprinkle the cheese on top and bake for 8 to 10 minutes.

Makes 6 to 8 servings.

Check out what else The Garden-Fresh Cookbook has to offer!

This entry is from guest blogger Sarah Perreault, Associate Editor of The Old Farmer's Almanac. You can begin reading about the adventure of our regular Garden-Fresh blogger, Jane B., in this space in a few weeks after she's done stocking up her kitchen and planting her garden!


UPDATE: I made this for supper last night (minus the mushrooms and apples) it was pretty good. Tonights going to be the following recipe.


Mexican Quiche Recipe

(found on page 14 of The Garden-Fresh Cookbook)

½ cup grated cheddar cheese
1 unbaked 9-inch piecrust (see recipe, page 272)
1 tablespoon vegetable oil
1 small onion, chopped
1 small green bell pepper, chopped
2 cloves garlic, minced
1 small tomato, diced
7 black olives, pitted and sliced
½ cup corn
2 teaspoons chili powder
1 teaspoon cumin
½ teaspoon dried oregano
Salt and pepper, to taste
6 eggs
1 pint whipping cream
Sour cream and picante sauce, for garnish

Preheat the oven to 350°F. Sprinkle the cheese onto the piecrust. In a skillet, heat the oil and sauté the onion, green pepper, garlic, tomato, olives, and corn until tender. Add the chili powder, cumin, oregano, and salt and pepper and stir to blend. Spread the vegetables over the cheese in the piecrust. In a separate bowl, beat the eggs until frothy, add the cream and beat to blend. Pour the egg mixture over the vegetables. Bake for 1 hour and 10 minutes, or until the eggs are firm in the center. Let stand for 10 minutes. Garnish with dollops of sour cream mixed with picante sauce.

Makes 6 to 8 servings.

What do you think of this recipe? If you have any thoughts, tips, reviews, or just a comment, let me know!

See free recipes, more cooking blogs, contests and great prizes on our Garden-Fresh Cookbook page!

This entry is from guest blogger, Amy Nieskens, Assistant Editor for The Old Farmer's Almanac Garden-Fresh Cookbook. You can begin reading about the adventures of our regular Garden-Fresh blogger, Jane B., in this space next week after she's done stocking up her kitchen and planting her garden.

Monday, March 21, 2011

FREEZER JAM...


Raspberry Chipotle Freezer Jam

Raspberry Chipotle Freezer Jam

Ingredients
1 1/2 cups sugar
1 fruit jell freezer jam pectin - pouch
1 chipotle peppers in adobo sauce
4 cups crushed raspberries

Directions
Combine freezer jam pectin and sugar in a medium bowl, stirring to evenly blend. Set aside. In food processor or blender, puree 2 chipotle peppers and 2 Tbs adobo sauce; removing seeds from peppers if a milder flavor is desired. Add chipotle pepper puree and crushed raspberries to pectin mixture. Stir for 3 minutes. Serve immediately, if desired. For longer storage, ladle jam into clean freezer containers, leaving 1/2 -inch headspace and apply lids. Let stand until thickened, about 30 minutes. Refrigerate up to 3 weeks or freeze up to 1 year. Note: For a stronger smokey flavor and added heat, use additional chipotle peppers until your desired flavor profile is achieved.

FYI...I WANT TO TRY THIS RECIPE BUT WITH MIXED BERRIES INSTEAD.

Wednesday, March 16, 2011

Stocking up...

I continue to learn how to STOCK UP and preserve the food which we grow/purchase. We are always scanning the weakly sale adds for the Specials of the Week. The last two weeks we purchased alot of tuna for $.50 a can. I haven't seen that in a while.

I also try to stock up on chicken breasts but find they start getting freezer burn, here is an example of How to can chicken. I also discovered a series of You Tube Videos by Wendy Dewitt, explaining why you should start storing food, how to rotate your food supply and talking about how to cook without electricity (solar) using a Food Saver Vacuum Sealer to extend the life of your dry goods in canning jars (vacuum packing). There are Nine videos in all. Well worth your time to watch them all, so much good information. Her blog is Everything Under the Sun. Check it out.

Also...how would you like for your stove to not only cook but also heat your water and your 1600 square foot home? Check out Homewood Stoves.

Monday, March 7, 2011

Food Security...

Everyone else is! I have been aware of food security issues for over 3 years now. This is one of the main reasons why my husband and I have been working to establish a productive garden, grow food to store, saving and collecting seed, learning how to preserve & process our own food, getting into permaculture, learning about medicinal herbs, wanting to get chickens, goats and bees, building community and encouraging others to 'grow their own', alternative cooking methods, and other long term preparedness skills related to food. Here are some articles/ blogs I've noticed lately:
Read the full article from "Eat at Dixiebelle's"

Tuesday, March 1, 2011

KITCHEN GARDEN...

I am trying this year to be a better gardener, so last week I finally started some of my seed indoors.
I planted some "fish peppers", supposed to be mildly hot also I saved some seeds from some "Italian red peppers" I bought at Sam's Club last year, we'll see if they will grow.
I wanted to start my tomato plants earlier this year and discovered I didn't have any seed left, so I ordered more seeds from Baker Creek Seeds and had my new seeds in 3 days. I ended up ordering 7 different kinds (all RED variety) for canning and making sauces and salsa.
So they have also been started and am hoping for a better yield this year.
The onions I planted are doing well even after the freezing weather we had this winter, Not sure yet if the lemon and lime trees survived, they were too big for me to bring in this winter, I will trim them back and see what happens.

I was listening to two older farmers/gardeners this week talking about their gardens and learned...

1. plant your potatoes on Valentines Day.
2. Wait until after Easter to set out your tomatoes.

Do you have any further advise for me?